# Firmware Configuration
Single-board computers use a [file-based system ](https://hub.subspace.services/books/hardware/page/single-board-computers-6VY "Single-Board Computers")store their settings while traditional computers use a [low-level operating system like BIOS or UEFI](https://hub.subspace.services/books/hardware/page/efi-bios "EFI & BIOS"). We explore some basic configuration options for an always-on server.
# Single-Board Computers
The [Raspberry Pi](https://www.raspberrypi.com/) computer series do not have a battery source to ensure that firmware settings are saved even if the computer loses power. This means that they do not use a conventional BIOS or EFI architecture.
[](https://hub.subspace.services/uploads/images/gallery/2025-02/1000006150.png)
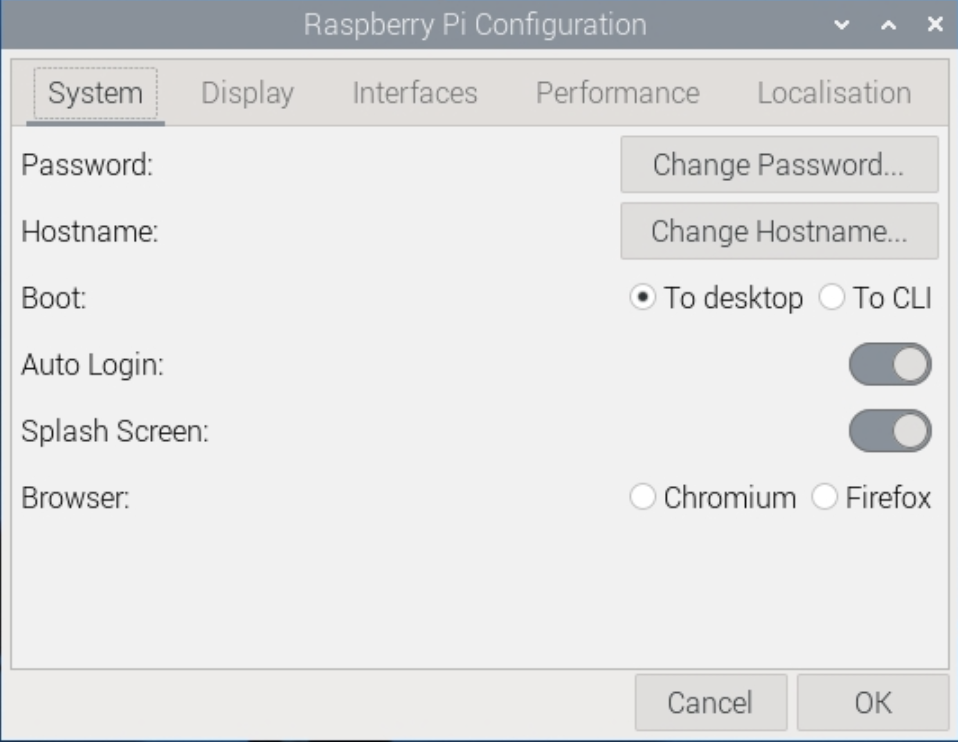
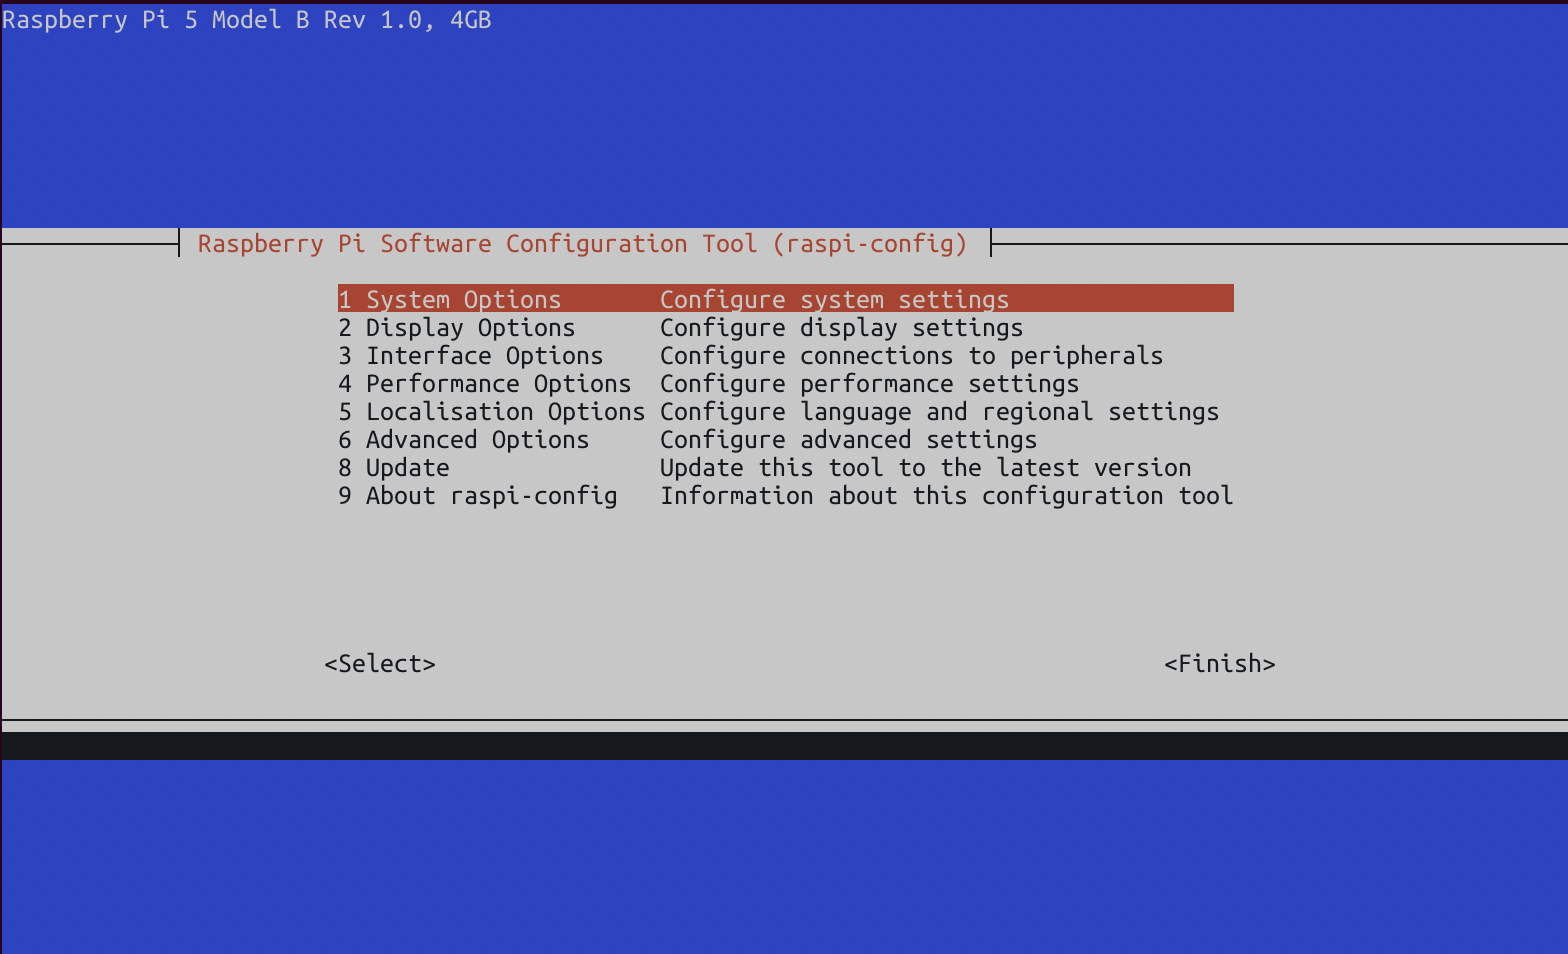
Instead, these systems use a configuration file that is stored on the hard drive and used to configure the system during the boot process. These settings are configured through the [command line](https://www.raspberrypi.com/documentation/computers/configuration.html) or a [graphic user application](https://projects.raspberrypi.org/en/projects/raspberry-pi-using/9).
[](https://hub.subspace.services/uploads/images/gallery/2025-02/1000006145.png)
## Performance Options
These settings pertain to the overall hardware performance configurations for your single-board computer.
Overlay File System
This option allows the Raspberry Pi to boot in a mode where [files on the SD card cannot be altered](https://storage.raspberrypi.com/product-information/f1a2k217gltilbt5cead63rjkbk9?response-content-disposition=attachment%3B%20filename%3D%22Making-a-more-resilient-file-system.pdf%22%3B%20filename%2A%3DUTF-8%27%27Making-a-more-resilient-file-system.pdf&response-content-type=application%2Fpdf&X-Amz-Algorithm=AWS4-HMAC-SHA256&X-Amz-Credential=product-information%2F20250211%2Feu-west-1%2Fs3%2Faws4_request&X-Amz-Date=20250211T224739Z&X-Amz-Expires=172800&X-Amz-SignedHeaders=host&X-Amz-Signature=267245ef0b145cc13a0ef386f29dd9fcf43869c82ce203743693e632f70d2ee7) and any modifications are only temporarily saved in memory while the operating system is powered on.
This increases the Raspberry Pi's life expectancy, but cannot be used for interactive systems that need to store long-term data between power cycles.
*Recommended:* Disabled
GPU Memory
This allows you to change the amount of memory allocated to the graphical processing unit of the Raspberry Pi.
Due to [fundamental differences](https://retropie.org.uk/docs/Memory-Split/) in the way that system-on-a-chip computers handle their graphical processing, this setting is an optimized default for your specific model. There is no need to alter these settings and doing so many decrease performance.
*Recommended:* Default
## Interface Options
These settings control the different physical and digital interfaces that can be used to interact with the Raspberry Pi.
SSH
This allows you to remotely connect to your server through a terminal and run commands to administrate your server.
*Recommended:* Enabled
VNC
This provides remote access to your Raspberry Pi's user desktop environment. We are disabling it to install RDP, a similar, more modern alternative. If desired, you can leave it on for additional access options.
*Recommended:* Disabled
SPI
The [Serial Peripheral Interface](https://learn.sparkfun.com/tutorials/serial-peripheral-interface-spi) is used by the Raspberry Pi to communicate with external sensors through the GPIO port.
*Recommended:* Disabled
I2C
The Inter-Integrated Circuit is an alternate standard used to communicate with devices through the GPIO port.
*Recommended:* Disabled
Serial Port
This disables serial connections through the GPIO port.
*Recommended:* Disabled
1-Wire
This disables a communication protocol that uses one wire on the GPIO port.
*Recommended:* Disabled
Remote GPIO
This disables [remote access to the GPIO port](http://abyz.me.uk/rpi/pigpio/python.html#pigpio.pi) through Python.
*Recommended:* Disabled
## System Options
These pertain to general settings of the core Debian operating system.
Change Password
For security, it is imperative that you change the default password for your Raspberry Pi computer.
Change Hostname
This allows you to change the name that your server uses while on your network; such as "raspberrypi.local".
Power LED
If desired, you can turn off the LEDs on the Raspberry Pi.
Wait for Network Connection
This requires that an internet connection is available before the Raspberry Pi will boot into the operating system.
*Recommended: Enabled*
## Disable Unused Hardware
Using rfkill to disable Bluetooth and wifi
[](https://hub.subspace.services/books/monitoring-maintenance/page/maintenance "Maintenance")
# EFI & BIOS
Computer hardware has evolved over the years and the industry stardard have continued to shift. This has led to computer hardware that leverage different mechanisms to achieve the same end. For low-level firmware, there are two technologies widely available for configuring hardware.
## BIOS
Older PC systems use a [BIOS](https://en.m.wikipedia.org/wiki/BIOS) – or Basic Input/Output System – to handle core functions before the computer has loaded an operating system. The BIOS is used to configure fundamental computer settings that affects how hardware interacts with the operating system. This architecture stores your settings on a small memory chip powered by a coin-cell battery. Through a user navigable interface, core computer features can be configured.
## EFI
Modern computer systems use UEFI – or the Unified Extensible Firmware Interface – to manage these settings through a graphic interface. Some systems require enabling an advanced or administer mode to access all firmware settings.
## Configuring Your Hardware
There are numerous manufacturers who use different BIOS and UEFI software for their computer systems. There is no definitive standard for BIOS or EFI systems, resultibg in many different descriptive names for the same features. While we try to cover the most common names, you may need to do some personal research. It's entirely possible that feature is not available on your computer system.
If a feature is missing, don't panic! You may still be able to follow these guides without running into any issues.
Some OEM systems, such as business-grade workstation PCs, have simplified firmware with minimal configurable options. This computer can work as a server but may require configuration through the operating system to properly manage power and efficiency settings.
These are some common keyboard commands to enter the BIOS or UEFI menu by manufacturer:
**ASRock**
F2 or Del
**Asus**
F2 or Del
**Acer**
F2 or Del
**Dell**
F2 or F12
**Gigabyte**
F2 or Del
**HP**
F10
**Intel**
F2
**Lenovo**
F1
**MSI**
Del
**Samsung**
F2
**Toshiba**
F2
## Disable Unused Hardware & Features
You can increase the overall security of a home server by disabling extraneous hardware as a proactive measure to decrease your [cyber attack surface area](https://en.m.wikipedia.org/wiki/Attack_surface).
Some common hardware components to disable are:
Serial Port
This legacy protocol is used for old modems and printers.
*Recommended:* Disabled
Parallel Port
This legacy protocol is used for old printers, scanners and storage devices.
*Recommended:* Disabled
Audio Ports
Our server ideally will be running "headless" (without a display) and should not be used as a media player.
This can include 3.5mm, optical, HDMI and other audio ports.
*Recommended:* Disabled
Bluetooth
Bluetooth can be left on for connecting smart devices to [Home Assistant](https://hub.subspace.services/books/home-family/chapter/home-assistant "Home Assistant"), but the [protocol can be insecure](https://www.cyber.gc.ca/en/guidance/using-bluetooth-technology-itsap00011).
*Recommended:* Disabled
Thunderbolt
This technology can be enabled for daisy-chaining multiple displays and storage devices, but it has [known vulnerabilities](https://en.wikipedia.org/wiki/Thunderbolt_(interface)) and should be disabled if not in use.
*Recommended:* Disabled
Wireless Internet
We will use a hardwired connection for our server and the wireless card should be disabled if not in use.
*Recommended:* Disabled
Trusted Platform Module
This technology is used [predominantly for Windows 11](https://learn.microsoft.com/en-us/windows/security/hardware-security/tpm/trusted-platform-module-overview) and ensures operating system files are not tampered with. Linux can [use the module for encrypting hard drives](https://wiki.gentoo.org/wiki/Trusted_Platform_Module), but it should be disabled otherwise.
*Recommended:* Disabled
## Power-Saving Features
We are running an always-on server which means our power efficiency settings are an important consideration. Turning off certain hardware when the computer is idle can increase their life expectancy, while turning off other hardware components can decrease stability.
Cool'n'Quiet or SpeedStep
[Cool'n'Quiet](https://en.m.wikipedia.org/wiki/Cool%27n%27Quiet) (AMD) and [SpeedStep](https://en.m.wikipedia.org/wiki/SpeedStep) (Intel) slow down the processor when idle to decrease overall power usage**.**
*Recommended:* Enabled
EIST
[Enhanced Intel SpeedStep](https://en.m.wikipedia.org/wiki/SpeedStep) is an advanced mechanism for dynamically scaling the processor's speed and power consumption.
*Recommended:* Enabled
C-States
This feature allows the CPU to temporarily disable processor sections when they are not being used by the operating system.
*Recommended:* Enabled or Auto
C1E
This is an advanced power-saving state that temporarily decreases the processor speed when idle while allowing for rapid return to an active state.
*Recommended:* Enabled
ErP Mode and EuP Mode
This is a comprehensive power feature related to an EU directive that aims to decrease overall device power usage.
While useful for a standard computer, the setting can fundamentally alter system performance by disabling or [underclocking](https://en.m.wikipedia.org/wiki/Underclocking) hardware.
*Recommended:* Disabled
## Boot Settings
We can ensure that our server correctly boots into the operating system and restarts automatically in the event of a power failure.
Boot Priority
If your server has multiple storage disks, you need to ensure that the disk with the operating system installed has first boot priority.
For security, you can disable booting from additional hard drives.
Keyboard and Mouse Halt
Our server will be remotely accessible and we do not always need input devices – such as a mouse and keyboard – connected to it.
Without this setting disabled, the server will fail to boot without them connected.
*Recommended:* Disabled
Secure Boot
This feature is used to verify operating system files during boot to ensure that malicious software cannot start.
By default, the hardware is configured for Microsoft Windows and can be [configured for use with Debian](https://wiki.debian.org/SecureBoot#:~:text=UEFI%20Secure%20Boot%20(SB)%20is,requiring%20further%20signatures%20from%20Microsoft.) if desired. Otherwise, it should be disabled.
*Recommended:* Disabled
Fast Boot
This feature disables several important power-on hardware tests and has been known to interfere with some operating system features.
This feature is not supported by Debian out of the box and needs to be configured.
*Recommended:* Disabled
Restart After Failure
In the event that your server loses power unexpectedly, it can be configured to turn back on when power is restored.
*Recommended:* Enabled
Wake-on-LAN
Your server can be powered on through your Ethernet connection over the Local Area Network when it receives a "[magic packet](https://en.m.wikipedia.org/wiki/Wake-on-LAN#Magic_packet)".
*Recommended:* Enabled
Power Schedule
Our server should remain on at all times and we do not want our server operating on a power cycling schedule.
*Recommended:* Disabled
## Storage Interface
There are some settings related to the way hard drives and solid state disks communicate with the operating system.
SATA Mode
[Advanced Host Controller Interface](https://en.m.wikipedia.org/wiki/Advanced_Host_Controller_Interface), or AHCI, enables the use of SSD drives through a SATA connection.
Additionally, it improves performance by strictly enforcing hardware communication standards that can be leveraged by the operating system.
*Recommended:* AHCI
RAID
[Redundant Array of Independent Disks](https://en.m.wikipedia.org/wiki/RAID_Array), or RAID, enables your system to duplicate hard drive writes in real-time.
This creates a fully functional backup in the event of a hard drive failure. This architecture needs to be setup before installing an operating system and cannot be installed after.