
Traditional Computer
Preparing a USB Boot Disk
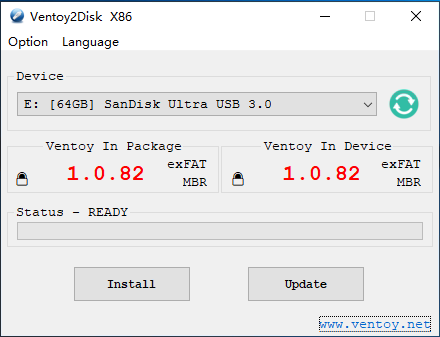
We need to create a USB flash drive that has everything required to boot into an operating system installation. You will need to obtain a USB flash drive that is at least 4GB. We will use Ventoy, an open-source utility that makes it easy to create a bootable USB flash drive.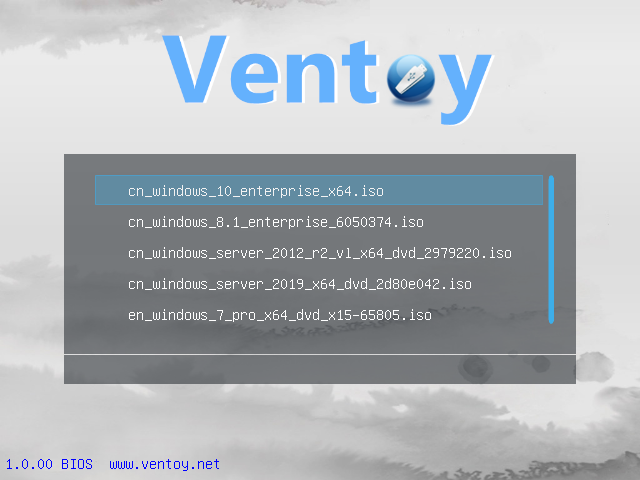
First, we will need to download the latest version from their downloads page. We need to download the Windows ZIP and extract it with the Windows compression utility. Using the Ventoy application, we can install it onto our flash drive.
They provide more in-depth installation procedures should you need them.
Downloading Debian
Next, we need to get an installation disk image for our desires Linux distribution. For the broadest compatibility we'll be using Debian, the "universal operating system".
Before we can install Debian on our computer, we must first download the appropriate installation image.
The AMD64 DVD installer will work for most cases.
Download the appropriate ISO file using your web browser.
Finalizing the USB Boot Disk
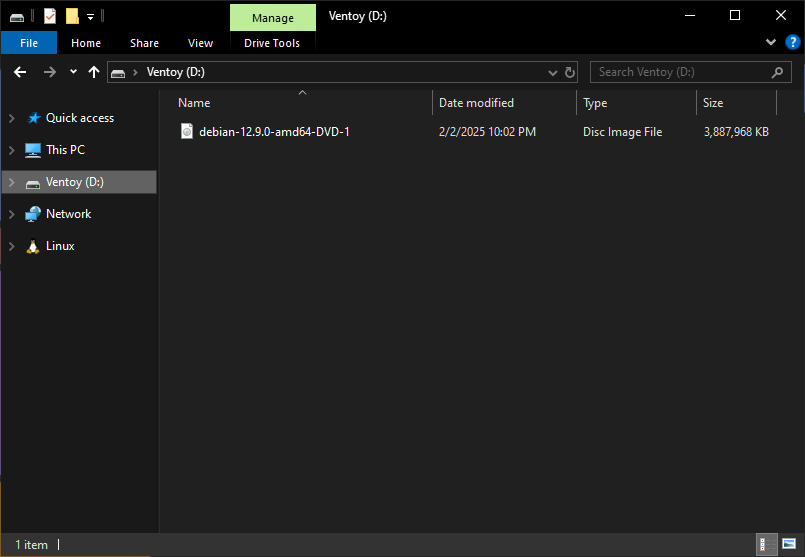
Once downloaded, it needs to be copied to the USB flash drive. This can be accomplished by opening Windows Explorer and navigating to the USB drive named Ventoy. Copy the downloaded ISO file to this mounted drive.
You now have a USB flash drive that can be used to install Debian Linux on most traditional computer systems.
This USB flash drive can be used to install other user-friendly distributions
Starting the Installer
In order to install Debian Linux, we need to boot into our newly created Ventoy flash drive. Due to a lack of standardization, different hardware will go about this differently.
Disable or unplug any hard drives that will not be used for the operating system.
This includes media, documents, and other data storage.
Most commonly, the boot device can be selected by hitting a specific key while the computer is starting up.
Refer to your computer or motherboard manual for more information.
These are some common keyboard commands to enter the boot menu by manufacturer:
| ASRock | F11 |
| Asus | F8 |
| Acer | Esc, F9 or F12 |
| Dell | F12 |
| Gigabyte | F12 |
| HP | Esc or F9 |
| Intel | F10 |
| Lenovo | F8 or F12 |
| MSI | F11 |
| Samsung | Esc or F2 |
| Toshiba | F12 |
Some media keyboards require that you press an FN key located along the bottom row in order to activate the function keys.
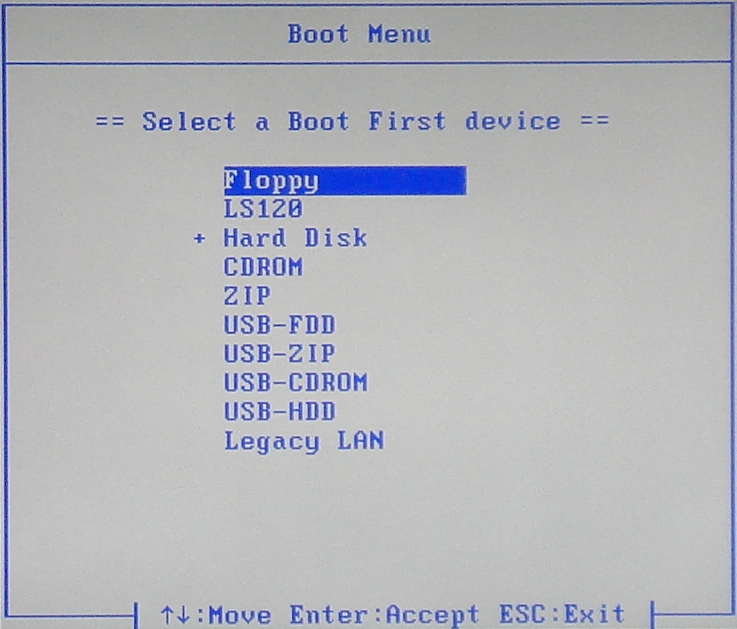
Through the Boot Menu, we use the keyboard to navigate down to your USB flash drive. Depending on your system's manufacturer, the boot menu could list your USB flash drive as:
- "USB-HDD"
- Model Number (i.e. KingstonDT)
- Partition Name (i.e. Ventoy)
Make sure to boot in UEFI mode if this is presented as an option.
Installing Debian Linux
Once your computer has been booted using the USB flash drive, we should be presented with the Ventoy boot screen.
We should only have one option available "debian-12.9.0-AMD64-1" or similar, depending on the current Debian version.
Select this option by hitting Enter, then select "Boot in Normal Mode" to begin loading the Debian installer program.
Connect a hardwired Ethernet cable to your server directly from the router.
This is required for automatic updates and driver installation, including your wireless internet card.
The Debian Installer will now ask us the preferred installation method and we will opt to use the "Graphical install." We can then select our preferred language, our geographic location, and which keyboard type we want to use.
If you are unsure, "Generic 104-key PC" is a good default setting for any keyboard with a Windows key.
After we input this information, the installer will detect your computer's hardware and begin loading the required files for installation.
Once this is finished, we'll be asked to configure our network connection. We will be using LAN, which requires your computer to be hardwired to your router with an Ethernet cable.
We can set the Host Name for our server, which affects how it is idenified on the local network. Choose a name that is meaningful to you, or simply name it "home-server". Additionally, we can leave the Domain Name blank.
Next, we will set a password for the Root account, which is the most powerful account on the server that has direct access to and control over all system functions.
We recommend using a password you've never used before that contains letters, numbers and special characters. Store this password in a secure place.
After the Root account is secured, we can make our user account. This profile will have fewer access privileges by default to increase server security. As needed, we can log in as Root to do server administrative tasks.
We recommend using a different password for your user and root accounts for increased security.
Enter your full name, or the friendly name displayed during login, as well as an account user name. On the next page, we can choose and verify this user account's password. Once our accounts are finalized, we can choose our server's time zone.
Ensure all non-system hard drives are physically disconnected.
This includes media, documents, and other data storage.
Next, we will need to begin setting up our storage drives for an operating system. The Debian installer will detect any hard drives available in your system. There should only be one available.
We are erasing the selected disk.
Always make sure you have backed up all important files from this drive.
We will be chosing "Guided - Entire disk" which will reformat the entire drive for use by the Linux operating system. We will select "Contiguous - all files in one partition" for simplicity.
Final Warning
Hitting Confirm will erase your drive.
On the next page, we can choose to use a network mirror. While not required, it can improve update download speeds by retrieving them from a server closer to your location.
Additionally, we can choose to opt-in to the "popularity contest" which periodically returns anonymized software install and usage metrics to Debian for use by developers.
Finally, we will be choosing our Desktop Environment. This operating system can act as the foundation for many different Desktop Environments which control the user interface and experience. This is a matter of personal preference that can affect which software is installed by default.
Debian uses GNOME by default, but other common desktop environments include:
For simplicity sake, we will use the default Desktop Environment and select Gnome.
On this last screen, we can also choose to install SSH to allow for remote access. We will chose to install it and save a step later.
Debian will begin the installation process.
Once the files are copied, the installer will tell us to remove the USB flash drive before restarting the computer to finish the installation.
Finalizing Installation
Once the computer has started, we need to login with the user account and password we set up during the installation.
You cannot access the root account through this login screen.
After logged in, we will be greeted with the welcome screen for our user account setup process. This will include language and typing settings, as well as privacy options.
We can now start using Debian and installing the software necessary to host a home server.